iOS6-5C
iOS 6 iPhone 5C tethered downgrade guide
This guide will show you how to install iOS 6 on your iPhone 5C, please note that it is very broken, touch does not work, and the device will kernel panic a few seconds after booting.
Disclaimer
I am not responsible for any damage to your devices caused by following this guide. Please proceed with caution and at your own risk.
Credits
- NyanSatan for the 32-Bit iOS Dualboot guide and fixkeybag
- throwaway for telling me how they booted iOS 6 on the iPhone 5C
- libimobiledevice for irecovery
- LukeZGD for Legacy iOS Kit
- dora2ios for ipwnder_lite
- danzatt for reimagine
- Darwin on ARM Project for image3maker
- iH8sn0w for iBoot32Patcher
- OothecaPickle for xpwn (Note: This is a fork of multiple forks, go to the repository to see who made the original and other forks)
Note
When I use angle brackets (< >), they indicate placeholders. Do not include the brackets themselves in your input. For instance, <enter> means press the Enter key, and <default value - 4> means you should input the default value minus 4.
Requirements
- A macOS system, you might be able to do this on Linux but I highly recommend using macOS
- IDA Pro for patching the kernelcache
- An iPhone 5 6.x iPSW, and an iPhone 5C 7.0 iPSW, you can get these from The Apple Wiki
- gnu-tar to compress the RootFS
- fixkeybag for generating the system keybag
- irecovery to send bootchain components
- Legacy iOS Kit for the SSH ramdisk to install the iOS 6 RootFS on to the device
- ipwnder_lite to put the device in pwndfu mode
- reimagine to decrypt firmware components
- image3maker to repack img3 images
- iBoot32Patcher to patch iBoot components
- xpwn for xpwntool and dmg, we will use xpwntool to decompress and recompress the kernelcache, and dmg to decrypt the RootFS
Preparations
First decrypt the RootFS DMG from your iPhone 5 6.x iPSW, you can get firmware keys and file names from The Apple Wiki
dmg extract encrypted.dmg extract.dmg -k <key>
Then convert it to UDZO format
dmg build extract.dmg udzo.dmg
Mount the DMG, take note of the mount point
hdiutil attach udzo.dmg
Enable ownership on the volume
sudo diskutil enableOwnership <mountpoint>
Create a tar from the volume
sudo gtar -cvf fw.tar -C <mountpoint> .
Partitioning
First, we need to boot the SSH ramdisk, enter DFU mode on your device and run Legacy iOS Kit
./restore.sh
Then navigate to Other Utilities > SSH Ramdisk and enter 11A470a for the build number, follow the steps to boot the ramdisk, then select Connect to SSH
Now once we are in the ramdisk, we need to partition the disk
gptfdisk /dev/rdisk0s1
Delete the existing partitions
d <enter> 1 <enter> d <enter>
Now create the new partitions
n <enter> 1 <enter> <enter> 524294 <enter> <enter>
n <enter> <enter> <default value - 4> <enter> <enter>
Rename the new partitions
c <enter> 1 <enter> System <enter>
c <enter> 2 <enter> Data <enter>
Write the new partition table
w <enter> Y <enter>
Now we need to create filesystems
/sbin/newfs_hfs -s -v System -J -b 4096 -n a=4096,c=4096,e=4096 /dev/disk0s1s1
/sbin/newfs_hfs -s -v Data -J -P -b 4096 -n a=4096,c=4096,e=4096 /dev/disk0s1s2
Extracting RootFS
Mount the new partitions
mount_hfs /dev/disk0s1s1 /mnt1
mount_hfs /dev/disk0s1s2 /mnt2
On macOS open another Terminal window and extract the RootFS tar over SSH
cat fw.tar | ssh -p 6414 -oHostKeyAlgorithms=+ssh-dss root@localhost "cd /mnt1; tar xvf -"
Note: When asked for a password, enter “alpine” as the password
After that completes, we need to move files to the Data partition, back on your device run
mv -v /mnt1/private/var/* /mnt2
We need to edit fstab to use the new partitions, back on macOS run
scp -P 6414 -oHostKeyAlgorithms=+ssh-dss root@localhost:/mnt1/private/etc/fstab ./fstab
Note: When asked for a password, enter “alpine” as the password
Open it in nano, in macOS run
nano fstab
And edit it to look like this

Send it back to the device
scp -P 6414 -oHostKeyAlgorithms=+ssh-dss ./fstab root@localhost:/mnt1/private/etc
Note: When asked for a password, enter “alpine” as the password
Now we need to install fixkeybag
scp -P 6414 -oHostKeyAlgorithms=+ssh-dss ./fixkeybag root@localhost:/mnt1
Note: When asked for a password, enter “alpine” as the password
Now create launchd.conf and set executable permissions
nano launchd.conf
And enter the following contents
bsexec .. /fixkeybag
Send it to your device
scp -P 6414 -oHostKeyAlgorithms=+ssh-dss ./launchd.conf root@localhost:/mnt1/private/etc
Note: When asked for a password, enter “alpine” as the password
Now back on the device, set UNIX permissions to 755
chmod 755 /mnt1/fixkeybag
Unmount both partitions and reboot the device
umount /mnt1 /mnt2
reboot_bak
Patching boot components
First decrypt iBSS and iBEC from your iPhone 5C 7.0 iPSW
reimagine iBSS.boardconfig.RELEASE.dfu iBSS.raw -iv <iv> -k <key> -r
reimagine iBEC.boardconfig.RELEASE.dfu iBEC.raw -iv <iv> -k <key> -r
Patch the iBSS and iBEC
iBoot32Patcher iBSS.raw iBSS.patched
iBoot32Patcher iBEC.raw iBEC.patched -b "-v amfi=0xff cs_enforcement_disable=1"
Pack the iBSS and iBEC into an img3 container
image3maker -f iBSS.patched -t ibss -o iBSS.img3
image3maker -f iBEC.patched -t ibec -o iBEC.img3
Decrypt the DeviceTree from your iPhone 5 6.x iPSW
reimagine DeviceTree.boardconfig.img3 devicetree.img3 -iv <iv> -k <key>
Decrypt the kernelcache from your iPhone 5 6.x iPSW
reimagine kernelcache.release.boardconfig kernelcache.dec -iv <iv> -k <key>
Decompress the kernelcache from your iPhone 5 6.x iPSW
xpwntool kernelcache.release.boardconfig kernelcache.raw -iv <iv> -k <key>
Open your decompressed kernelcache in IDA Pro, make sure your settings are the same as below when opening it
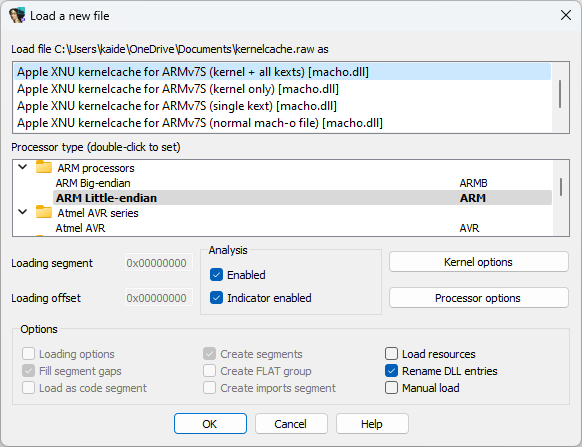
Note: If you get any extra windows just click OK
Once the file is open, navigate to Edit > Select all in the toolbar, then press C, then click Analyze, this may take up to an hour
Note: If it asks “Undefine already existing code/data?” click Yes
Once the kernelcache is fully analyzed, navigate to Search > Text…
Now search for “could not find system ID”
Once the search is finished, you should see something like this
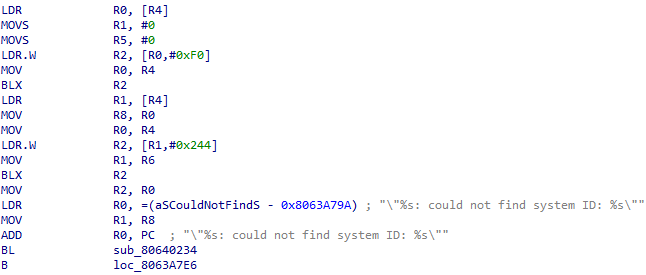
Place your cursor just before BL and switch to hex view

Press F2 and type 00BF00BF and press F2 again, this should replace the highlighted 4 bytes with 00BF00BF

Now switch back to IDA view and navigate to Search > Text… again, this time searching for “XIP is still set”
Once the search has finished, you should see something like this

Place your cursor just before BL and switch to hex view

Press F2 and type 00BF00BF and press F2 again, this should replace the highlighted 4 bytes with 00BF00BF

Now switch back to IDA view and navigate to Edit > Patch program > Apply patches to input file…
Leave default settings and press OK
Now recompress the kernelcache
xpwntool kernelcache.raw kernelcache.img3 -t kernelcache.dec
Booting the device
Put the device in pwndfu mode
ipwnder_macosx
Send iBSS
irecovery -f iBSS.img3
Send iBEC
irecovery -f iBEC.img3
Send DeviceTree
irecovery -f devicetree.img3
Execute DeviceTree
irecovery -c devicetree
Send kernelcache
irecovery -f kernelcache.img3
Boot the device
irecovery -c bootx
Done!
Contact
If you are having issues with this guide or think something needs to be explained clearer, you can contact me on Reddit or Discord, my Discord username is kaidenac